I'm having a lot of fun with Camtasia Studio's 5 software producing video. The only downside is that it takes quite awhile to produce a video and that my computer struggles to keep up. This time the subject is on using Lightscribe to label your CD's and DVD's. You can also check out my "How-to" post on using Lightscribe here.I hope you enjoy the video and find it helpful.
Showing posts with label lightscribe system software. Show all posts
Showing posts with label lightscribe system software. Show all posts
Monday, August 18, 2008


Sunday, December 2, 2007
How-to : How to use LightScribe

Tired of labeling discs with sharpies or trying to get those stick on ones to centered just right. LightScribe technology prints embeds them right on the disk. Recently I installed a new CD/DVD writer with Lightscribe feature. Some people may have bought a newer PC with this feature and have no clue how to use it. My goal is to try and help those who may be asking how do I use this, what do I need or perhaps those who are just wondering what exactly LightScribe is. I've been using this for a few weeks now and thought it would make a great demonstration.
What exactly is LightScribe? LightScribe is a technology that laser-etches images on a CD or DVD disc. A special disc drive is needed. A LightScribe logo should be on the outside the drive indicating this feature is included.
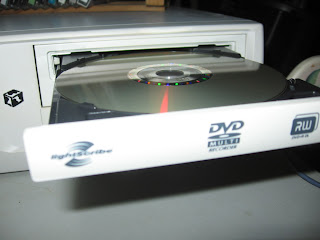 LightScribe logo on left
What you need to start....
Hardware: Like I said you need to have a drive that is LightScribe included. It should have a logo somewhere on it.
Software: Mine included software from Nero OEM software included when I bought the drive. Which does work. I also downloaded from the LightScribe website a separate program which basically does the same thing. For purposes of this demo I'll be using that one. I downloaded LightScribe System Software plus templates which can be downloaded here. They also include software for use with either Linux or Mac operating systems on the same page.
Media: Obviously you need blank CD?DVD's to start with. You can't just throw any blank disc in and expect it to work. These are specially coated work with LightScribe technology. They do come in a variety of colors with I believe gold being perhaps the most popular. They do cost slightly more than comparable standard issue media but it's not an astronomical amount.
What exactly is LightScribe? LightScribe is a technology that laser-etches images on a CD or DVD disc. A special disc drive is needed. A LightScribe logo should be on the outside the drive indicating this feature is included.
 LightScribe logo on left
What you need to start....
Hardware: Like I said you need to have a drive that is LightScribe included. It should have a logo somewhere on it.
Software: Mine included software from Nero OEM software included when I bought the drive. Which does work. I also downloaded from the LightScribe website a separate program which basically does the same thing. For purposes of this demo I'll be using that one. I downloaded LightScribe System Software plus templates which can be downloaded here. They also include software for use with either Linux or Mac operating systems on the same page.
Media: Obviously you need blank CD?DVD's to start with. You can't just throw any blank disc in and expect it to work. These are specially coated work with LightScribe technology. They do come in a variety of colors with I believe gold being perhaps the most popular. They do cost slightly more than comparable standard issue media but it's not an astronomical amount.
Now for the Demo....
For demonstration purposes I'll be using the LightScribe System Software that I downloaded from there website. Yours maybe included in your disc burning software already included on your PC (example:Nero etc...). I believe the steps are similar but you may have to adapt to them accordingly. Also I'm going to assume you've already burned a disc and your ready to rock and roll. If were on the same page were ready to etch our first disc.
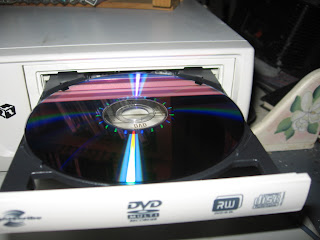
Step 1. Open your CD?DVD drive and insert disc. Very importantly you insert it upside down(label side). Don't worry too much if you do it wrong the drive will eject when you go to etch it if it's wrong side.

Step 2. Open LightScribe software by clicking on your desktop icon or through your program menu. For this demo I'm using the LightScribe Template Labeler.

Step 3. Choose your template you wish to use. Or you can choose a blank one to edit yourself.

Step 4. Insert your images by clicking and inserting images. It will open a separate window which you can search for and select images. You can insert text in a similar fashion by selecting "Click to add text"After you are satisfied with your selection can go to the next step.....

Step 5. Click "Next" and then click "Preview and Print". Here we make our final selections. First we select the drive we want to use. If it's you only drive it will be selected by default. If you've got more than one be sure you've got the disc in the correct drive. We also have an option for choosing contrast level. I usually choose"Best"(why would I want less? I don't know). Also is the number of discs you want to etch . We select "1" in this case. Then when were all done and were ready we select "Print".

Step 6. We now enter the final phase. Which is now printing your image. This process usually has taken me about twenty-five minutes or so. This may vary with each disc. It's good time to grab a refreshment or take a break from this hard work.When it's done the disc will eject automatically and you get to see your masterpiece. Your done then. You might find some might come out too light or fuzzy so you may have to adjust your contrast settings.
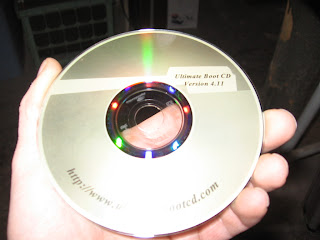 Final product
In the end...
Well that about wraps it up for today. I've found this to work wonderfully and I'm satisfied with the results. Now I hope you have an idea of what LightScribe is, what you need to do it and how to do it. You can always consult the LightScribe website for more templates and software downloads. They are also full of tips and tricks on how to take advantage of this feature. You can always contact me also if you have any questions or comments. I'll get back to you as soon as possible. I'd glad to be of help to you. Thanks for coming by and I hope you'll come back again soon.
For demonstration purposes I'll be using the LightScribe System Software that I downloaded from there website. Yours maybe included in your disc burning software already included on your PC (example:Nero etc...). I believe the steps are similar but you may have to adapt to them accordingly. Also I'm going to assume you've already burned a disc and your ready to rock and roll. If were on the same page were ready to etch our first disc.

Step 1. Open your CD?DVD drive and insert disc. Very importantly you insert it upside down(label side). Don't worry too much if you do it wrong the drive will eject when you go to etch it if it's wrong side.

Step 2. Open LightScribe software by clicking on your desktop icon or through your program menu. For this demo I'm using the LightScribe Template Labeler.

Step 3. Choose your template you wish to use. Or you can choose a blank one to edit yourself.

Step 4. Insert your images by clicking and inserting images. It will open a separate window which you can search for and select images. You can insert text in a similar fashion by selecting "Click to add text"After you are satisfied with your selection can go to the next step.....

Step 5. Click "Next" and then click "Preview and Print". Here we make our final selections. First we select the drive we want to use. If it's you only drive it will be selected by default. If you've got more than one be sure you've got the disc in the correct drive. We also have an option for choosing contrast level. I usually choose"Best"(why would I want less? I don't know). Also is the number of discs you want to etch . We select "1" in this case. Then when were all done and were ready we select "Print".

Step 6. We now enter the final phase. Which is now printing your image. This process usually has taken me about twenty-five minutes or so. This may vary with each disc. It's good time to grab a refreshment or take a break from this hard work.When it's done the disc will eject automatically and you get to see your masterpiece. Your done then. You might find some might come out too light or fuzzy so you may have to adjust your contrast settings.
 Final product
In the end...
Well that about wraps it up for today. I've found this to work wonderfully and I'm satisfied with the results. Now I hope you have an idea of what LightScribe is, what you need to do it and how to do it. You can always consult the LightScribe website for more templates and software downloads. They are also full of tips and tricks on how to take advantage of this feature. You can always contact me also if you have any questions or comments. I'll get back to you as soon as possible. I'd glad to be of help to you. Thanks for coming by and I hope you'll come back again soon.
Sunday, November 11, 2007
Lightscribe System Software
I may have mentioned before that last week I bought a new DVD Writer for one of my PC's. One of the features of it was something called Lightscribe. Lightscribe does sort of what it sounds like. It scribes labels on your CD/DVD. I had seen this advertised before and it was a selling point for me. Well just yesterday I finally purchased some Lightscribe CD/DVD's and decided to give it a try. My first couple of ones I wasn't impressed with. I used the Nero OEM software that came with the writer. They came out very light and were hard to read. I thought to myself I'm doing something wrong. So I Googled lightscribe software and I came across there website. I found some cool softwre add-ons and an update for my label writing. It also seems like I didn't have the latest Lightscribe System Software. I tried it out again this morning using one of the templates I downloaded and using Lightscribe program and low and behold it came out beautiful. Crisp clear and easy to read. For right now if you bought a writer with Nero do yourself a favor and checkout the Lightscribe website and update your software and use there software to do the label. I do like it overall and can't wait to try another. Take care and thanks for coming by.
Subscribe to:
Posts (Atom)